You want to create your first Mobile App but does not really know where to start? What are the steps required? How to organize yourself? I prepare a step by step guide for you to follow in order to reach your goal.
These are the 10 steps to follow for you to be successful in creating a Mobile Application:
1. Create a Mobile App Idea
If you already have a mobile app idea, then you can skip this step and go the next one! But if you brainstorming to have a great idea for your app. After reading this step, you will be able to learn good techniques to help you come up with your next hit app idea.
As you may know already, we live in a world that is very well connected and everyone have great idea and most of them are probably existing into an App. Keep in mind that there is rarely a completely new idea that is born from nothing. We all get inspired by something to create and connecting the dots.
There are over 6 million apps in the Google Play and Apple App Store combined according to Statista.com:
Most ideas are variations and combinations of old existing ideas. If you keep this in mind, it opens up your mind to think more creatively. Alright, on to the first technique:
Technique #1: The Remix Technique
One way to come up with a great app idea is to put a improve an existing idea or try to combine elements from various apps that you like. For example, if multiple application are doing small tasks you can combine the apps into one application.
This happens all the time and produces great results!
Here’s how you can do it for yourself:
Think of a few apps that you use very often. Is there a way that you could take the most useful features and mix them together to form a new type of app?
Got your app idea already? Skip to the next step then!
Technique #2: Get your fix
This is the most valuable technique to build a mobile application idea from it. Why? Because if you solve a problem that you are facing in your life, most probably the users of the app might have the same problem as your! So this can be a reason that your app will be successful! The simplest ideas produce the greatest results! These simple ideas rarely come out of a brainstorm for app ideas.
If the problem can be solved with an app, that’s a really good reason to create one!
Write down any of these ideas even if you know a mobile app already exists to solve this problem because as you’ll see in the next step, there may be an opportunity to make a better app than what currently exists.
Technique #3: Improve an existing app
Have you ever used an app and thought, “It would be so much better if this could have this feature in it?” That’s really a good potential app idea! There’s always room for improvement so if you thought that an app was lacking a useful feature, chances are that you weren’t the only one to think that.
Do not stop here ! Because if the original app author isn’t constantly updating and improving the app, then there’s an opportunity for you to create an even better app. See ! there is always a way to improve.
One way to figure out whether or not you’re right about this is to check the reviews and ratings for the original app on the Google Play Store or Apple Store. If you can identify that people are complaining about the same thing or are they complaining about something different? Is the app author responding to this feedback or not? All of these can give you an indication if you can pursue this way or not.
The next step is to validate your idea to make sure that it has a chance to thrive in the app store.
2. Do a market analysis to identify the competitors
Now, we need to validate if the problem that you identified and that you app solved is being solved by other apps.
Don’t be disappointed if you find out that other apps in the App Store or Google Play Store that are already solve the same problem that your app does. Remember what I said earlier, there are no new ideas and there is always room for improvements.
Actually, this can be a good thing because that tells you that your idea is viable and there is a real need for it. That’s why there is competition! And you always have competition even if you are in a niche market and a pioneer in it, competitors will come after.
The main goal here is to understand if the need is being met by these other existing apps. Potentially, these apps may be out of date or the app author may have stopped updating them.Or maybe none of them meet the mark of what the audience really needs and wants.

Scroll through the ratings and reviews of any competing apps you find. Take note of the following:
- App Name
- Feature set
- Price/monetization scheme
- App publisher
- Last updated
- Ratings and Reviews
- Downloads
You might want to create an Excel spreadsheet to keep track of your results. This research that you’re doing right now is going to create the starting point for the features to include in your own app and which ones to focus on first.
Here’s what you’re looking for:
App Name
This is mainly just for identification purposes to keep track of the various apps you will look for. Some people do put keywords as part of the app name as well. As you go through the list of the competing apps, see if you notice any specific words that keep coming up in the title of the app and consider using such a keyword for your app title.
Feature Set
Write down all of the features for each competing app. Make note of:
- What the core features that all the competing apps have
- What are the features unique to each of the competing apps
- What features might be completely missing from any of the existing apps
Later on when we look at the reviews, you will also try to see if users mention specific features that they love or hate.
Price/monetization
Is it a one time fee for the app? Is it free but monetized in some other way? A Subscription? The reason it is important to take note of this is two:
- How do the users like the way it is monetized? For example, some people hate ads and would rather pay for an app than to deal with ad banners inside the app.
- You can potentially monetize your app differently. For example, if the app is good but too expensive, you can find other ways to monetize your app.
App publisher
Who published the app? Is it an individual or a company? (Or is it a one-man company?)
The point is to see who is your competitor. Large companies have big budgets for marketing teams and often have a team of people just working on a single app. It would be hard to compete against such company. I am not trying to discourage you here but we need to understand who you are trying to battle with. If it is an individual’s name then it is typically a single person and that gives us a little bit of reassurance if you are planning to go about this by yourself.
Sometimes if the app publisher is a company name, it could just be the company that the individual has registered. Visit the company website listed to try to figure out if it’s a single person or a big company.
Last updated
You want to figure out how well this app is being maintained. If the app author has not updated in a long time, then there’s an opportunity for you to take the market share. However if the author is frequently updating the app then you will want to make a note of this because this app will be competing with you actively.
Ratings and Reviews
How are users rating this app? If the app is rated badly, try to figure out why. Is it a lack of features? Is the app broken? This insight will help you avoid those pitfalls.
On the flip side, if the app is rated highly, download it and try it out for yourself, paying special attention to the feature set and user experience. This will guide you in how you design, plan and prioritize the features for your own app. Whether the app is rated poorly or highly, there’s something to learn here. This is invaluable user feedback that you did not have to pay for (in terms of dollars or blood and sweat) to find out!
Downloads
The number of downloads for an app is not written on the App Store app or Google Play Store app listing but there are tools out there to “spy” on apps and get this information as an estimate. For example, SensorTower is one such tool that let you see the estimated number of the number of downloads of an app for free. Or you can also check on SimilarWeb.
Now on the flip side if not much competition exists for your app idea, it could be that it’s such a new and novel idea that no one has ever thought of it before or it could be that the idea isn’t viable. Why? Because the market might not be ready for that idea. A lot of good ideas in the past did not work not because they were not good enough but because users were not ready to buy the idea. (This also can be a good way to search on good idea that failed in the past and bringing back to life !)
Validate your idea
Start by deconstructing your idea a little bit so that you can succinctly convey the idea, audience and purpose of the app in 30 seconds to someone. Then practice delivering that elevator pitch to yourself in the mirror so that you’re comfortable saying it.
When you’ve got a clear description of your app idea and you’ve practiced your explanation, try pitching it to your close family and friends. These people won’t hesitate to tell you the truth. Ask them to play devil’s advocate and try to poke holes in your app idea. If your idea is too complex that you cannot explain it in an elevator pitch then that means you need to simplify your app idea.
That may uncover something you hadn’t thought about or it might force you address something you brushed aside in your excitement.
If you’re getting good vibes about your app idea from this step so far, let’s move on!
The more people you pitch your idea to, the better. Strangers, friends of friends, people on the internet etc. Don’t be afraid to communicate your idea. Most of people are scared to share idea because they think that other will steal it but there is a difference between having an idea and take action to bring this idea to life as a product or service!
3. List the features for your Mobile App
This part is a lot of fun because you get to dream! Take your app idea and imagine what a perfect version of your app would be.
The vision will evolve and change based on actual user feedback and testing but for now, the sky’s the limit. Get it all down on paper and realize your idea and breathe some life into it.
If you want, you can also think about how you will monetize the app. I do recommend that this shouldn’t be the main focus of your app idea though. In the beginning stages of an app, user adoption is always more important. Keep in mind that the most simple the app is the faster your will be able to execute it.
In the past this process was called business requirements gathering and it was the most important phase of the project because it helps clarify what clients wanted.
Now you do not have to be super rigorous and detailed for your own app idea but it is still a good idea to identify the overall goal and strategy to your app idea as much as possible now. Once you get into execution, any changes you want to make could potentially mean lots of wasted work and effort.
You don’t have to decide on how many screens the app will have or what is on each screen; that’s for the next step.
For example, if your app idea is a social networking app, then you might start writing:
- Users will be able to create an account.
- They can create a new account using an email and password or they can login with social medias.
- Users will be able to set a username, profile photo and short bio.
MVP stands for “minimum viable product”
the idea is that it’s better to launch a small (but still useful) version of your product first so that you can get it into the hands of actual users. That will help you get real world feedback from real users which can guide and correct your understanding of what people actually want. Based on that feedback, you release an update to your app with more features and again, get it into the hands of users for feedback.
You repeat this cycle over and over and eventually arrive at a product that perfectly fits what the market wants.Contrast this with spending a ton of money and time to build something and then finally launch it… only to find out that people didn’t want it.
So take a look at all of the features you wrote down and think about what a simplified version 1 would look like. Make sure that the app can still be useful to your audience and solves the overall problem but it doesn’t (and shouldn’t) have all the bells and whistles for phase 1. More than likely, the bells and whistles you thought of might turn out to be not what your users needed in the first place.
Any feature that doesn’t directly contribute to serving the overall purpose of the app can be considered for Version 2. All of the essential features that are left will be your minimum viable product!
4. Make design mockups / wireframes of your app
Now you’re ready to start thinking about how to design an app that is intuitive and easy to use. What will the user see and how will they interact with your app to use its features? Usually, people just start with a pencil and notebook or piece of paper because everything is in flux and there’s a lot of rough sketching as your develop your ideas. But personally I use tool like Sketch or Figma to create my wireframes / mockups for any new Mobile Application.
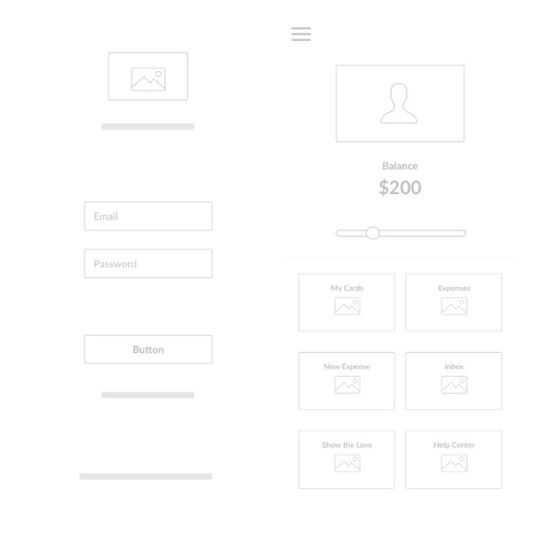
Main screens
Can you separate the functionality of your app into distinct sections or screens? These directions will be somewhat general since I do not actually know what your app idea is but I find the best way to do this is to imagine yourself using your app.
How many different sections make sense for displaying the information that you need to see?
Once you have a fair idea of the screens you will need, move onto the next step. You are not going to get it 100% right at this point and it’s completely normal to make changes during this design process as you move along!
Main navigation
Now that you have the main sections of your app, think about the main mechanism for navigating around inside of your app. Is it going to have a tab bar at the bottom? Or maybe it’s going to use a slide in side menu to navigate to the various sections of the app? I would recommend taking a look at some of your favourite apps and paying attention to how you navigate around the app.
The best type of navigation is one that feels natural and intuitive. If you had to think about how to get find something, then that’s a problem.
What is Usability?
Usability is a term that describes how easy it is to use a product/service for its intended purpose. It is part of a topic called User Experience (UX for short) that studies how a user feels towards a product as they are using it. As product designers (yes, apps are considered products!), we can inspire delight, awe and satisfaction from the user by how we choose to design our app.
In this step of the app development process, we’re focused on maximizing usability and making the app as easy to use as possible. This comes down to deciding what to display on each screen and how to arrange the user interface elements on the screen.
There’s so much that goes into designing an app that is optimized for usability. Spend a few hours reading about usability basics and then go for it. The Apple Human Interface Guidelines is a great place to start.
Once you get your app into the hands of real users, you will get a ton of legitimate and practical feedback. At this point, all you can do is try to follow UX best practices.
Design Tools
Now in terms of putting pencil to paper, there are a variety of tools that you can use instead of pencil and paper (there’s nothing wrong with that by the way; i love doing this process in a comfy chair with a notebook and pen).
However, if you’d like to create your mock up digitally then you can take advantage of the most famous digital tool:
I consider Figma as a close equivalent to Sketch with some benefits. It is browser based which means that it can be used on PCs or Macs. This offers great collaboration features for teams. Figma is free to use and you only have to pay if you want to use the aforementioned collaboration features.
5. Create the graphic design for your app
Now it’s time to bring your app to life visually by designing exactly how your app will look like.
You’re creating a graphic design that:
- Represents the look of the final product
- Can be used in presentations to sell potential investors or partners
- Developers can use to integrate the graphic assets into the project
The user interface and user experience (UI/UX) of the app will be hugely impacted by the work that you do in this step.
That’s why I recommend that you get some help from a professional graphic designer who has proven work designing app UIs if it’s very important that to you to have a slick, professional looking app.
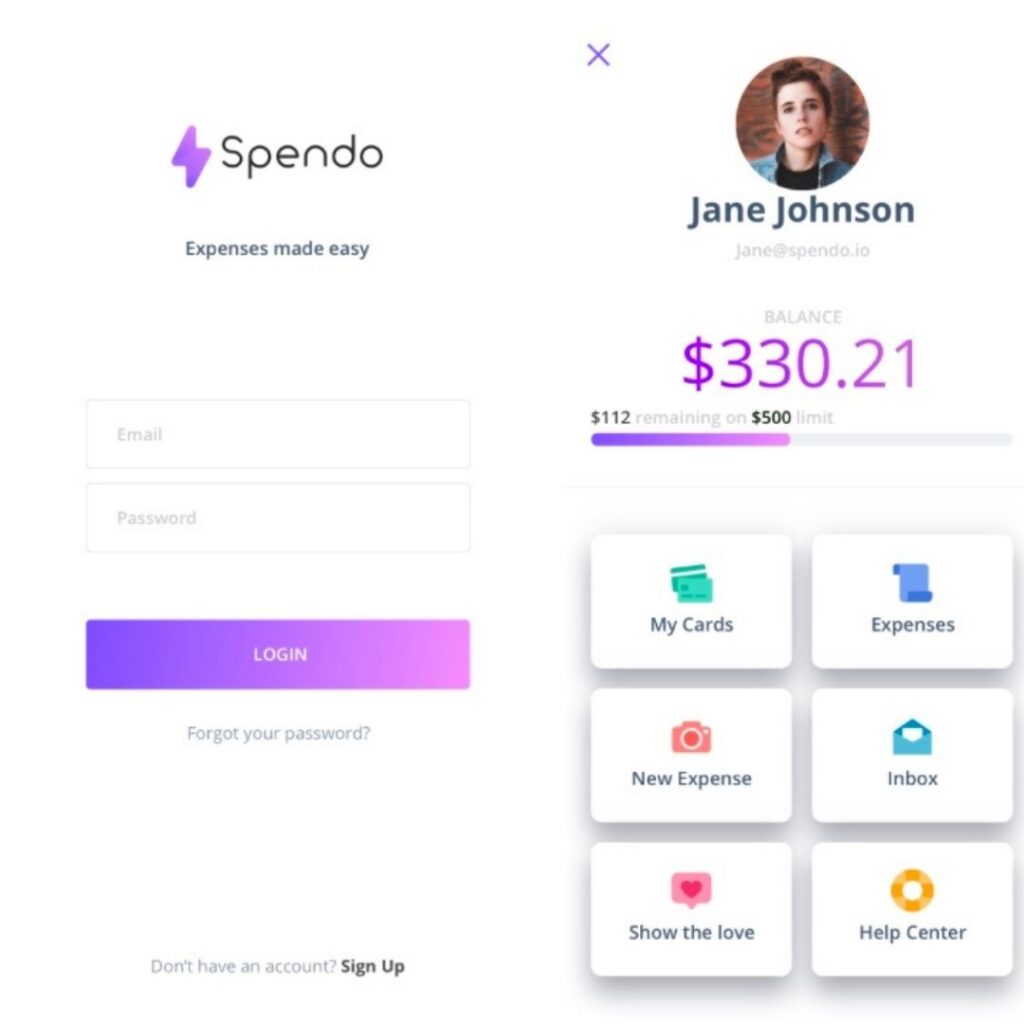
Remember on the previous step when I showed you the wireframes, above you can see the graphic design, so basically I re-used the wireframes and added the branding colors, logo, pictures, icons, etc… to look it more attractive for any potential presentation to developers or investors.
Once you have your app design done, you can proceed to building your app. Personally though, I like to create an app marketing plan first.
6. Put together an app marketing plan
There are more than 4 million apps in the iOS App Store and Google Play Store. In order to make sure that your app gets seen, you need to have a plan to market it to the right audience. These days, a lot of the marketing work happens before the app is launched! For example, building a pre-launch email list is standard practice these days as well as leveraging paid marketing to promote your app.
Here are a list of app marketing strategies you can follow pre-launch and post-launch to make sure that you put your best foot forward!
Things you should do before your app is published:
- Build a landing page for your app and build a pre-launch email list: It’s important that you have a landing page for your app at the very least so that people have somewhere to visit to learn more about your app. Make sure you add a call to action for people to sign up to a pre-launch email list to get notified when the app launches. To start collecting emails for free, sign up for an email service with a generous free-tier like Mailchimp.
- Include a media kit for your app: A media kit is simply a package that contains some key information about your app and all of the logos for your app. It makes life easier for journalists who want to write about your app and who wouldn’t want more press? Simply create one and add a link to it from your app landing page.
Things you do after your app has launched:
- Do a press release for your app: These are relatively cheap to do and can get the attention of some online news and magazine outlets. Here’s a great guide to how to write a press release for your app.
- Consider paid marketing: If you have a bit of marketing budget, doing some paid marketing can really give your app a boost. Unfortunately, there are so many different types of paid marketing that you can do that it can be overwhelming. I’ll talk about the most effective paid strategies later in this article.
- Email your pre-launch email list: Once you’ve launched, don’t forget to let everyone know! Email your subscribers and update your audience!
7. Build the app with one of these options
This is the step where you actually bring to life your app from the design and requirements document that you created in earlier steps. By the way, this is the stage that you should get excited about!
Just like the previous steps, you have a couple of options to make your app.
- Learn to code and build it yourself: This is most time consuming option but you’ll gain a valuable and in-demand skill to build your own apps or get a job as a developer. If this option appeals to you.
- Hire an app development company: The difference is that an app development company will provide consulting and project management services. You can get in touch with us if you need app developer (Contact us here!)
- Use an app builder: If you’re looking for how to create an app without coding, this is for you. There are services out there where you can get an app built by selecting a template and making cosmetic choices to change it. Typically these platforms charge you a monthly fee to keep your app running.
- Buy an app template and customize it (or pay someone to): With this option, you’re buying pre-packaged code that contains the core functionality that you’ll need (if you can find a template close to your app idea).
Note the best options are option 1 or 2 to get something valuable and be proud of your final product. (3 and 4 might work for a version 1 but your app will not really stand out compared to other apps).
8. Submit your app to the App Store or Google Play Store
Here’s the exciting part! You are finally ready to launch your app into the App Store or Google Play Store so that millions of people can download your creation!
Here is how it works:
- Ensure that you have a Developer’s account to App Store or Google Play Store
- Create your metadata (name, description, app screenshots, video preview if needed, support website link, T&Cs page link)
- Submit your app on App Store or Google Play Store (this might take some time before an answer from Apple or Google)
- You should receive an email once the application is live
That’s it now your Application is live! You can sit back and relax …. not really now you have to think about your version 2, 3, 4, 5 … etc… to keep your users using your app and not go to the competitors.
9. Market your app for maximum exposure
In addition to executing on your marketing plan, here are some high-impact app marketing strategies you can use.
- Get featured by Apple in the App Store or Google Play Store: If you pull this off, you’ll win big time. Although there’s no guaranteed way to do this, there are things within your control to maximize your chances!
- Run a paid-to-free campaign: If your app is a paid one, going free for a short period and getting the word out there during that period can generate mountains of downloads.
- Step up your ASO (app store optimization) game: ASO doesn’t end when your app launches! You can still affect the discovery of your app within the App Store by tweaking your app metadata.
- Influencer marketing: This is surprisingly a great strategy for apps! Find influencers who have audiences that fit your apps target demographic and ask them if they can do a shoutout or mention of your app. They’ll quote your some prices and you can go from there.
- Advertise on social medias: Platform like Youtube or Instagram are great for advertising your Mobile Application, especially with a nice video that presents your application.
10. Improve your app with user feedback
The key to a successful app is continual improvement! We call it Lean, to keep improving for your customer experience. Once your app is in the hands of real users, you will start getting some feedback. Some good and some bad.
Take the criticism positively and be thankful that someone is willing to tell you how to improve because if someone is speaking up, there’s most likely more users that feel the same but aren’t willing to speak up.
Show your users that you’re not abandoning your app after the launch.
Show them that you’re constantly improving the app and releasing bug fixes, new features and app updates.
Over time, you will beat out the other mobile apps in your niche that aren’t doing this!
Conclusion:
In conclusion, you might be overwhelmed with all these steps, at the beginning this is normal and maybe you will define your own methodology on how to create your mobile app. This article is just here to give you some structure and guidelines.
In case you feel that you cannot achieve this goal by yourself, District 11 Solutions will be more than happy to assist you to create your mobile app, we have experts in UI / UX design, developers in both platform iOS and Android but also cross platform such as React Native.
Contact our expert team here:
You need to start somewhere to get where you want to be.